Basic Analysis
- This is a starting point
- Naming cells and ranges.
- This is covered in pages 94-99 in your book.
- In my opinion, this is one of the best time savers.
- Names
- Letters, numbers, _ and \
- Can't start with numbers
- Limited to 256 characters.
- Cant be something like a cell address (A10 is not a valid name)
- I apparently have already created a name in this worksheet.
- Go to the Formulas tab.
- Click on the Name Manager in the Defined Names workgroup.
- Note the defined name for Fall 19.
- Excel sometimes produces names for internal use.
- Let's see this first.
- I want to create a list of unique Titles.
- Make a new worksheet, Titles
- Add a comment in cell a1, stating that this is the basic analysis of the course
- Go to the Data tab and select Advanced from the Sort & Filter command group.
- Select
- Copy to another location
- Copy to as A10 on the titles worksheet
- Unique records only
- Select G1:g191 from the Cleaned Data worksheet for the List Range.
-

- We will do more with the advanced filter later.
- But note, it expects the first cell to be a column label.
- It would behave badly if you did not include cell G1.
- Now look at the name manager again (Formulas, Defined Names, Name Manager)
- The scope is on the Titles worksheet only.
- Click in any empty cell in the Titles worksheet and put =Extract
- Try that in another worksheet.
- Clear the cells with clear contents
- There are a number of ways to create a name.
- The name box.
-

- To use
- Select a cell or range of cells.
- Click in the Name box
- Type in the name.
- Press enter
- Caution
- This is the easiest but
- If you give a name that is in use, you will just select that name.
- If you give a cell name, you will just select that cell.
- If you don't press enter the name will not be recorded.
- The name box does have a drop down list of names created.
- You can't edit names in the name box.
- Select A11:A29 in the titles workbook.
- Name this CourseTitles
- In Cell A4 put Unique Titles
- In Cell B4 put =counta(CourseTitles)
-

- The Define Name dialog
- In the (Formulas, Defined Names) command group.
- This checks for most of the errors associated with the name box.
- Plus you can add a comment, and define the scope.
- Let's select Cleaned Data G2:G191 and name it RawTitles with a scope of the Titles workbook only.
- We don't want a header here, as we will be counting.
- Back to the titles worksheet.
- In A3 put Total Titles
- In B3 put =counta(RawTitles)
-

- Let's use countf to count the occurrences of each title.
- In cell b11 put =countif(RawTitles, A11)
- Copy this down with a double click.
-

- Clean up this table
- Draw a corresponding chart.
-

- Create from Selection
- Go to the Cleaned Data worksheet.
- Press ctrl-end to go to the last cell
- Press ctrl-shift-home to select all the data to the first cell.
- Click on Create from Selection in (Formulas, Defined Names)
-

- Select top row only
-

- Now go to the name manager, see what it has done.
- Names are created from the headers
- We should probably have fixed these first.
- The title is not included.
- Everything is global.
- Names are fixed so that they are legal. (IE _ for space)
- You can edit and filter.
- He cautions us to be careful deleting names.
- This will cause any functions using these names to be in error.
- One more automatic name I know of.
- Go back to the cleaned data worksheet
- Select everything again.
- Insert Tab, Tables, Insert Table
- Notice this created a new name
- Table2 in my screen shot as I created at table1 and deleted it in practice.
-

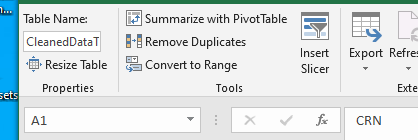
- We can rename this in the Table Tool special tab.
- In the upper left hand corner.
-

- Note, this changes the name in the name manager.
- We will want to name tables as this is helpful when we combine multiple tables in a pivot table.
- Dumb cool trick
- Create a new worksheet.
- Move to cell a1
- Press F3
- Select Paste list
- Names are cool and I think important.
- You should use them to document your work.
- If there is time, gratuitous pivot table to see the problem.
- <


