Chapter and Page Numbering
Goals
When you complete this section, you should be able to deal with a document which includes chapters and specially formatted page numbers.
Notes
- Resources
- This video was helpful
- I will work with this file.
- This material is briefly mentioned on page 226 of your book.
- Note:
- This is a tricky task.
- Patience is required.
- It is probably best left to the last thing in a document.
- Attention to detail is required.
- Goals
- For this document, we would like to have the following
- A cover page
- A section, numbered with roman numerals, containing all of the table of ... entries
- A Chapter for the introduction.
- A chapter for History
- A chapter for Lighthouse Technology
- A chapter for Building
- A chapter for Maintenance
- A chapter for Preservation
- A chapter for Popular Culture and Symbolism
- A section the index and Bibliography.
- The first page of a chapter should have not headers or footers
- The remaining pages should have a page number on the bottom left and the chapter name on the bottom right of the page (in the footer)
- Beginning
- Start by going through your document and put place holders in for the tables.
- At the top of the document:
- immediately after the title.
- put in a heading for the table of contents
- put in a heading for the table of figures
- Mark each of these as a heading.
-

- At the bottom of the document
- Create a header for the index
- And one for the bibliography.
- Use caution to make sure you do not add this text, or any others to the end note section.
-
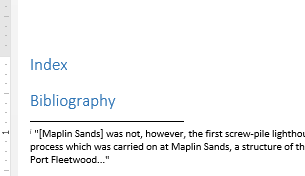
- Place next page section breaks between
- Using the Breaks menu on the PAGE LAYOUT tab:
-
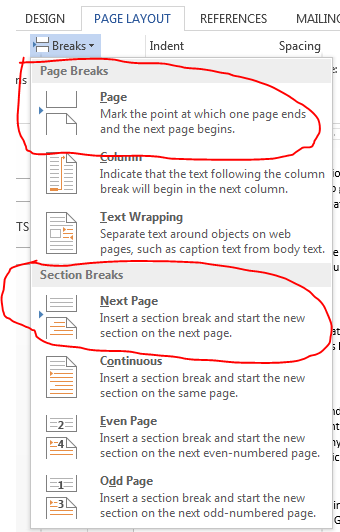
- The Title page and the table of contents
- The index and the Introduction chapter
- Between each chapter
- Between the last chapter and the index.
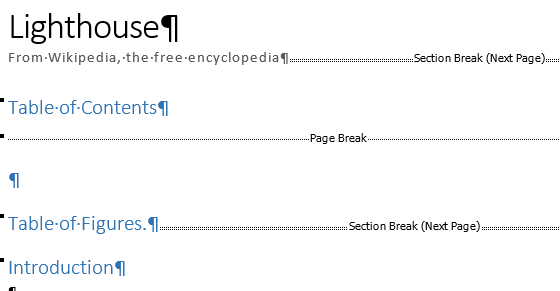
- in this case, we want the table of contents and the table of figures to be in the same section, but on different pages
- Place a page break, not a next page section break, between these two.
- Do the same for the index and the Bibliography.
- The Navigation pain is extremely helpful in performing these tasks.
- The Hide/Show button on the HOME tab will show where these breaks have been inserted.
-

-
- The Web Layout view is probably helpful here too.
-
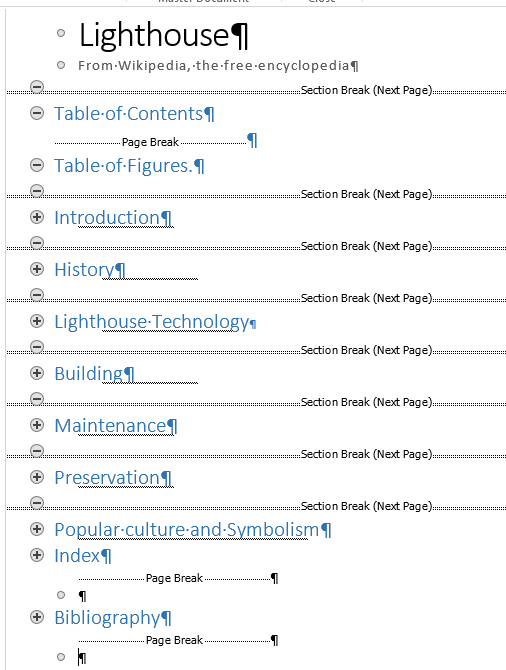
- Finally, the Outline view on the VIEW tab is useful here.
-

- Sections can be collapsed and expanded to give an overview of the document.
-
- Configuring Headers and Footers.
- This step is crucial to avoid frustration later.
- Begin editing headers and footers
- Double click in a header or footer area
- Or select a header or footer configuration from the Header & Footer section of the INSERT tab.
-

- Or select Edit Header or Edit Footer in the drop down menu for Header or Footer in the Header & Footer section of the INSERT tab.
-
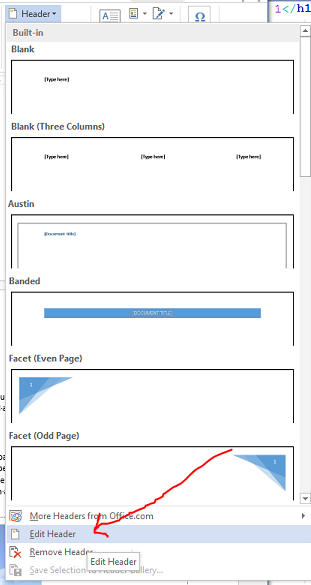
- Once you have begun editing the headers and footers, you will be placed in the DESIGN tab for Header & Footer.
- Pay attention to the following
- Link To Previous
- Different First Page
-

- These need to be set correctly BEFORE you begin editing headers and footers.
- Changing these values after you have applied headers and footers may cause your work to disappear.
- I am going to give examples of each, but you should SET THESE CORRECTLY FOR THE ENTIRE DOCUMENT BEFORE you begin editing your headers and footers.
- Each of these applies to a section.
- Different First Page
- This appears to be one setting for both the headers and the footers.
- As we have seen before, it makes the first page different from the other pages.
- Move to introduction section.
- This should be Header -Section 2-
- Note the Link to Previous is on and Different First Page is not selected.
- In the header type Hello
- Note that this header shows up throughout the document.
- Go back to section 2, and click on the Different First Page
- Now notice, that
- The word Hello disappears from the first page of section 2
- It is still on the second page of section 2.
- Other sections of the document are not changed.
- Add Section 2 to the first page of section 2 and notice the changes.
- Since we want the first page of every chapter to be different, we want to go through the document and select Different First Page for each section.
- Link To Previous
- This applies differently to headers and footers.
- This tells word to copy the header and footer information from the previous section.
- Go to Section 2 and make sure that Link to Previous is blue.
- Notice the heading on the second page of section 2. It should be Hello
- Now go to the title page and change the word Hello in the heading to Bah
- The heading in the first page of section 2 did not change, as Different First Page is selected.
- But the heading on the second page, as well as the headings in all other sections did.
- This is because Link to Previous is enabled.
- Move to Section 3 (Introduction).
- In the header type No, Don't Do it.
- Notice that all of the header changed, except for the first page of section 2.
- This is the result of having Link to Previous enabled.
- Go to the header of the first page of Section 2
- Disable Link to Previous
- Go to Section 1 and change the header.
- Finally, look to see if
- The header of a page has changed.
- Link to Previous for that page is set.
- Link to previous is setable for
- The headers in a section, if Different First Page is not selected.
- The footers in a section, if Different First Page is not selected.
- The header on the first page, and the header for the rest of the section if Different First Page is selected
- The footer on the first page, and the footer for the rest of the section if Different First Page is selected
- If you want a different first page, with different headers and footers for the balance of the section you must
- Create the section
- Select Different First Page
- Disable Link to Previous for the header and the footer on the first page.
- Disable Link to Previous for the header and the footer for the the other pages in the section.
- This is even more complicated if Different Odd & Even Pages is selected.
- A test
- Return to the document, in Section 2
- Mark Different First Page
- For the headers and footers, disable Link To Previous
- Change the header in the first section to be Section 1 header
- Change the footer in the first section to be Section 1 footer
- Change the header in the section section first page to be Section 2 header page 1
- Change the footer in the section section first page to be Section 2 footer page 1
- Change the header in the section section second page to be Section 2 header other pages
- Change the footer in the section section first page to be Section 2 footer other pages
- Put a page break in the middle of the second page and notice the headers and footers throughout the document.
- Repeat this procedure for all 10 sections of the document.
- Page Numbering
- Page numbering is controlled through the Format Page Numbers dialog.
- This can be accessed from the INSERT tab, Page Number drop down menu.
- Or in the DESIGN tab for Headers & Footers in the Page Number drop down menu.
-
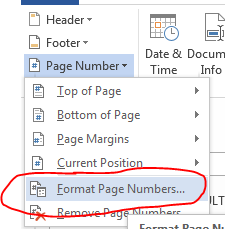
- This brings up the Page Number Format dialog box.
-
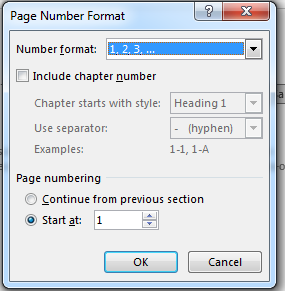
- Which allows you to control formats, starting points and other options.
- Changes made to page numbering apply to the current section.
- Number the table pages with roman numerals beginning at (i)
- Move to the second section, select the header
- Bring up the Page Number Format dialog box.
- Select number format i, ii, iii, ...
- Select Start at and change the value to be i
- Move to the footer of the first page,
- Tab to the center of the footer and type ()
- Move to the middle of the new parentheses
- Select Page Number → Current Position → Plain Number from the Page Number Menu
- This should insert an i
- Repeat this for page 2 of section 2.
- Number the pages in section 3, starting at page 2 with 2
- Change the format to be 1,2,3, ...
- Change Start at to be 1
- Notice that there are may different page number styles and locations to choose from.
- Marking Chapters
- We now want to mark chapters as chapters.
- Move to any Heading 1 item.
- Go to the HOME tab, in the Multilevel List menu, select the following
-
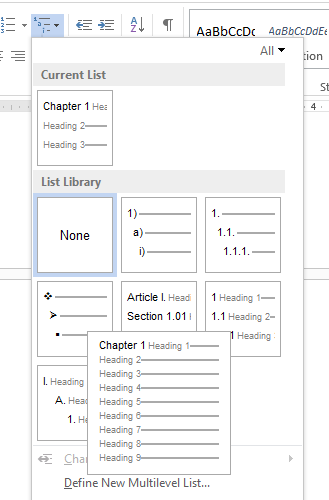
- Notice, that all level 1 formatting now has Chapter n in front of it.
- Unfortunately, this includes some non chapters as well.
- For the Table of Contents, Table of Figures, Index and Bibliography, mark these as TOC Heading style.
- Update the field codes for the entire document.
- Alternatively, you might have to restart the list numbering at the Introduction chapter.
- You can now add the chapter to the page number
- In the Page Number Format dialog box, select Include Chapter number
- Build the Table of Contents, Table of Figures, Bibliography and Index for this document.
- Note that these do not appear in the Table of Contents.
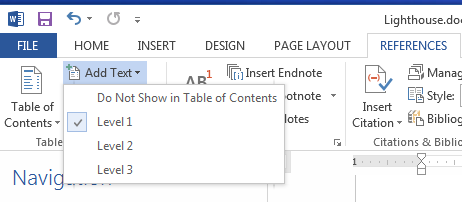
- Move to the REFERENCE tab.
- Select the word Index
- In the Table of Contents section, select Add Text menu
- Select Level 1
-
- Rebuild the Table of Contents.


