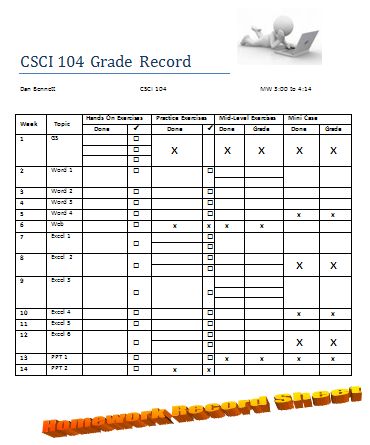
Create a check-sheet for this class.
You have decided that you need to create a check-sheet to keep track of your homework in this class. Using the skills you learned in chapter 3, create such a document. See the reference image at the bottom of this page.
- Open a blank document and save it as chap3_checksheet
- Create a title CSCI 104 Grade Record
- Insert , under the title,
- Your name
- CSCI 104
- Your class times.
- Insert an image in the upper right hand corner of the page. You may use any image you want.
- Insert a 16x10 table (16 rows 10 columns)
- Insert the following column headings
- Week - column 1, rows 1 and 2
- Topic - column 2, rows 1 and 2
- Hands On Exercises - columns 3 and 4
- Practice Exercises - columns 5 and 6
- Mid-Level Exercises - columns 7 and 8
- Mini Cases - columns 9 and 10
- Insert the following sub column headings
- Done - column 3
- Check Mark - column 4
- Done - column 5
- Check Mark - column 6
- Done - column 7
- Grade - column 8
- Done - column 9
- Grade - column 10
- In the first column, insert the numbers 1 through 14 in the rows.
- In the second column put the following topics
- GS (getting Started)
- Word 1 - Word 4
- Web
- Excel 1 - Excel 6
- PPT1 - PPT 2
- Using the course web page,
- If a topic requires more than one assignment within a category, add more rows to the table entry for that assignment.
- If a topic does not require a submission in a category, place an X in both boxes.
- For example, Getting Started had three hands on exercises, so make three rows in the Week 1 Hands On Exercises Done and Check entries.
- Getting Started did not require any other exercises, so place an X in all other column entries.
- For any entry that requires you to show me your work in class, place a box in the check column.
- At the bottom of your document insert word art.
- Adjust all rows and columns to make everything fit.
- Make the column heading bold.
- Center horizontally and vertically where it makes sense.
- You may apply additional formatting to your document

